Contents tagged with WinForms
-
How to Make Chrome Kiosk Mode “just Work”
There’s a reason why I haven’t blogged about UWP lately: The overall development experience (slow turnaround cycles, silent crashes, HRESULTs instead of error messages, you name it) drove me mad up to the point I scrapped my whole project, a digital signage solution, in early summer. Instead, I now use Chrome as my “render engine” and things are working pretty well. Without prior experience in using ASP.Net Core, WebAPI and SignalR, I have been able to whip something up to be ready for the 2018/19 Basketball season.
During development, I had to figure out
- how to use Chrome without any… chrome (i.e. no title, adress or tool bars),
- how to move the Chrome window to the secondary screen,
- how to close Chrome from code and
- how to still be able to use Chrome for browsing during development.
tl;dr: On https://github.com/RWeigelt/ChromeKioskModeDemo you find a small demo project (C#/WinForms for simplicity) that’s pretty self-explanatory.
Problems #1 and #2 are easy: Chrome has a so-called kiosk mode (command line parameter
--kiosk http://www.example.com) that will display the specified web page in full-screen mode. Another command line parameter deals with with positioning (--window-position=top,left). In the demo code you’ll see other parameters, they force the window size for a cleaner startup.Problems #3 and #4 turned out to be connected to each other.
One might wonder what’s so hard about closing Chrome from code. Don’t you just start a process with
Process.Startand remember the returnedProcessinstance, to later call itsCloseMainWindowmethod? What could possibly go wrong?Well, for starters, that
Processinstance may live shorter than expected. If you have a couple of Chrome windows and/or tabs open, Chrome will do a lot of process management behind the scenes – and “your” process may not be the one displaying the requested web page.On the other hand, if you go from zero Chrome windows to one window with a single tab, things are nice and easy. Now while you could force yourself to use a different browser during development, you never now whether there isn’t some Chrome window open later in production.
Fortunately, if you specify a different “user data directory” (
--user-data-dir=directory) when starting Chrome, you can achieve this “one window, one tab, one process” scenario even if you have many windows and tabs open.For details, take a look at the code on https://github.com/RWeigelt/ChromeKioskModeDemo. This C#/WinForms project shows a form with two buttons:
- “Open Chrome” will open http://www.example.com in full-screen mode on the second monitor (sorry, you have to have a second monitor for the demo).
- “Close Chrome” closes the Chrome window without affecting any other Chrome windows.
Note that this is not a library, just some code I have taken from my solution (stripped down for clarity). You’ll want to adapt it to your needs anyway. Have fun with it!
-
1st Place for EventFilter!
The winners of the programming contest over at the German website www.dotnet-snippets.de have been announced – my entry EventFilter was chosen by a jury from almost 100 entries to be the winner.
EventFilter is a generic helper class for dealing with events that may be raised multiple times in rapid succession, when only the last event of a “burst” is of interest.
You find the English version in this blog post I published recently.
-
EventFilter Helper Class
EventFilter is a generic helper class for dealing with events that may be raised multiple times in rapid succession, when only the last event of a “burst” is of interest.
Introduction
Imagine a Windows Forms program mimicking the GUI of the Windows Explorer, where selecting a folder in the tree view on the left side will update the list of files on the right. A "quick'n dirty" implementation would handle the
SelectedNodeChangedevent of theTreeViewcontrol to update the file list, but a robust implementation that works nicely with slow media like CD/DVD or network drives should use a different approach.When playing around with an actual instance of Windows Explorer and watching it more closely, you'll quickly notice that the file list is not updated immediately, but after a slight delay. You can use the keyboard in the tree view to move quickly from folder to folder, skipping folders you are not interested in. Only after you stay on a folder for a little while, the file list gets updated.
This approach of "wait until things have settled down a bit and then handle the last occurrence of an event" is pretty common in GUI development. The typical implementation uses a timer that is reset each time a new event is raised within a certain time interval, until the timer is finally allowed to elapse. Only at that time the event will actually be handled.
During development of a small hobby project called RemoteCanvas I got tired of taking care of timers, helper variables and event handlers over and over again, so I finally wrote a helper class acting as a "filter" for events.
Usage
- Declare a member variable to hold an instance of the
EventFilterclass, with an event argument type matching that of the event to be filtered:private EventFilter<EventArgs> _filter
= new EventFilter<EventArgs>();. - Hook up the
HandleOriginalEventmethod to the original event of the control. There's no great design time support for this, so you have to do that manually, e.g.myControl.SelectedIndexChanged += _filter.HandleOriginalEvent; - Connect the
FilteredEventRaisedevent to your event handler:_filter.FilteredEventRaised += MyHandler; - That's it!
Download
The source code for the helper class (plus a small demo project for Visual Studio 2005) can be downloaded here.
- Declare a member variable to hold an instance of the
-
Custom Editing Behavior for DataGridView TextBox Columns
I’m currently working on a hobby project where I’m displaying a list of files in a way similar to the “details” view of Windows Explorer. For various reasons I’m using a DataGridView instead of a ListView, and while configuring the DataGridView to look like a ListView wasn’t much of a problem, there’s one thing that got on my nerves, which is the behavior of textbox cells in edit mode: It is much too easy to leave the edit mode accidentally, simply by pressing the cursor keys at the wrong time. For example when the text caret is positioned behind the last character of the textbox cell content, and you press the right arrow key: the focus then moves to the next cell. There are certainly use cases for this behavior, but for my purposes I wanted the text caret to be “captured” inside the textbox in edit mode until you press Enter, Tab or Escape (or use the mouse to click another cell).
The nice thing about the DataGridView is that you can tweak it a lot by deriving from existing classes for cells, columns and editing controls, overriding certain methods. In my case I suspected that the DataGridViewTextBoxEditingControl (derived from TextBox) would contain special code to determine when the cell should leave edit mode. As I didn’t know what to search the documentation for (and I was too impatient to read it completely, to be honest), I fired up Lutz Roeder’s Reflector and took a look at the decompiled code of the class members. With the option “Show Inherited Members” switched off it took me only a couple of seconds to come across the code of the EditingControlWantsInputKey method which looked exactly like what I was expecting (lucky me: it was the 4th member in the list ;-).
So here are the steps to change the behavior of the editing control:
First derive a class from DataGridViewTextBoxEditingControl and override the EditingControlWantsInputKey method:
public class CustomDataGridViewTextBoxEditingControl
    : DataGridViewTextBoxEditingControl
{
    public override bool EditingControlWantsInputKey( Keys keyData, bool dataGridViewWantsInputKey )
    {
        switch (keyData & Keys.KeyCode)
        {
            case Keys.Prior:
            case Keys.Next:
            case Keys.End:
            case Keys.Home:
            case Keys.Left:
            case Keys.Up:
            case Keys.Right:
            case Keys.Down:
            case Keys.Delete:
            return true;
        }
        return base.EditingControlWantsInputKey( keyData, dataGridViewWantsInputKey );
    }
}
Then derive a class from DataGridViewTextBoxCell and override the EditType property to use the customized editing control:
public class CustomDataGridViewTextBoxCell
    : DataGridViewTextBoxCell
{
    public override Type EditType
    {
        get { return typeof( CustomDataGridViewTextBoxEditingControl ); }
    }
}
Finally derive a class from DataGridViewTextBoxColumn to be able to use the new cell type.
public class CustomDataGridViewTextBoxColumn
    : DataGridViewColumn
{
    public CustomDataGridViewTextBoxColumn()
        : base( new CustomDataGridViewTextBoxCell() )
    {
    }
}
You can now use the new column type in your code as a replacement of the stock DataGridViewTextBoxColumn (the new type appears in the drop down lists for column types in the designer dialogs of the DataGridView control).
A demo project is available here, showing a DataGridView with a normal DataGridViewTextBoxColumn and the CustomDataGridViewTextBoxColumn next to each other, so you can compare the different behaviors.
-
How to Set the CSS Class on an HtmlElement Instance from C#
I’m currently using the WebBrowser control in a WinForms application as a simple layout engine, as it’s much faster when rendering texts in front of a background image than WinForms (and I need it by the weekend, so I don’t want to take the risk of using it as a learning project for WPF). For my purposes I only need to manipulate some texts – and the CSS class of specific elements on the page.
Now let’s assume you have an DIV tag in your HTML like this:
<div class="someClass">Hello World</div>
and you want to change the CSS class from your C# code. It’s pretty easy, you just have to get a
HtmlElementinstance representing the tag and use theSetAttributemethod. What took me some time to figure out is the problem that if you callmyHtmlElement.SetAttribute("class", "anotherClass");nothing will happen in the display of your page. The reason for this is that SetAttribute does not actually “set an attribute of a tag”, but a property (representing the attribute) on an object (representing the tag) in the Document Object Model (DOM) – and the property’s name is “className”, not “class”. So the correct code is
myHtmlElement.SetAttribute("className", "anotherClass");(If you're wondering why SetAttribute didn't complain about using the name "class": the DOM was primarily designed to be used from Javascript, which is a language where any object can be extended by simple setting a property. Sounds a bit strange, but it’s also a feature that can be used for seriously cool stuff)
-
LinkBox - Fun with Panels, LinkLabels and AutoScroll
Remark: This is a spin-off of my work on GhostDoc. As the control I wrote for GhostDoc is highly specific to the actual problem I wanted to solve, I’ll only explain the basic idea and provide the source for the “LinkBox” control which I use as a base class. For some basic use cases this control may already be sufficient, for other use cases you’ll have to add some code.
Situation: I need something like this in one of my dialogs:

(Note this is a mockup inspired by an Outlook dialog,
not related to my work on GhostDoc)Clicking a link raises an event, the event arguments provide information about which link was clicked.
If necessary, scrollbars appear:
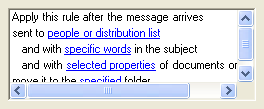
Question: How do I implement this?
First thought: Web browser control. Why? Because of the links. Hmm… Do I need any other feature of HTML? No, just the links.
Second thought: In this case, a web browser control smells like overkill. So what else gives me multi-line text, links and scrolling? A RichTextBox control. While using a RichTextBox for text input (its main purpose) can be a bit frustrating, I’ve had good success in the past using it for output (see this and this post). And you can have links in rich text. By default, only http and mailto links are supported, but that’s a limitation that can be circumvented (see this CodeProject article by “mav.northwind”). Unfortunately, the RichTextBox control’s LinkClicked event only provides the text of the link — which can be a problem when trying to identify which link was clicked.
Third thought: If I’m able to crank out a user control for my specific needs with little effort, I’d definitely prefer that to using a web browser control. So what’s the simplest thing that would work for me? Do I need multiple links in one line? No. OK, so I can use a LinkLabel control for each individual line (which makes identifying which link was clicked pretty easy).
The solution: A user control completely filled with a panel (to get the sunken borders), link labels are added dynamically (with auto-sizing enabled) and are docked to the top, so I don’t have to take care of positioning. Scrolling is taken care of by the panel (AutoScroll), the AutoScrollMinSize is easy to determine as the labels are auto-sized (so width = largest width and height = y-coordinate of the last label’s bottom border).
The code can be downloaded here, complete with a demo project:
linkBox1.AddText("This is some fixed text");
linkBox1.AddLink("The quick brown {0}", "fox");
linkBox1.AddLink("jumps over the lazy {0}", "dog");
linkBox1.AddLink("This is a {0} with a tag object", "test", "Some tag object");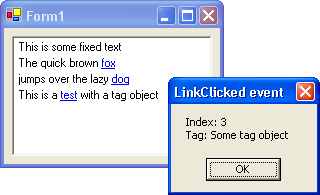
As already mentioned, the LinkBox control may be sufficient for simple use-cases. For more complicated use-cases (where you may need updating/refreshing), the control offers a SetText and an UpdateAutoScrollSize method (which in the GhostDoc source are called by a derived control). If you use LinkBox purely as a base class, you should think about making the methods protected — in a derived, application-specific control, you typically specify some sort of “data source” object and the control takes care of keeping the display up-to-date.
Implementation detail: This control uses docking for its layout, so the z-order of the LinkLabel controls is important. In general, when you add controls docked to the top in the forms designer and look at the resulting code, you’ll notice that the controls are added in reverse order. This reversed order is necessary because of the z-order that influences the docking. To achieve the correct z-order without the adding the controls in reversed order (which would make things a bit more complicated when adding controls programmatically like LinkBox does), you have to set the child index of the control:
thePanel.Controls.Add(theLinkLabel);thePanel.Controls.SetChildIndex(theLinkLabel, 0);In the case of the LinkBox control, this leads to the situation that
thePanel.Controls[0]does not contain the LinkLabel control representing the first line. This is nothing you usually have to care about, I just mentioned it to avoid confusion in case you dig a little bit deeper in the debugger e.g. when running the demo. -
Splitter Control with Drag Handle
Here's some code straight from my work on GhostDoc that just has started again with new energy after a pause in the weeks before Christmas.
I think most of us will agree that Splitter controls are really cool. Once you have learned the basics, there's virtually no excuse not to use them in your dialogs. The splitter itself is invisible, but in most cases users can easily guess where a splitter might be, and when the mouse pointer is over the splitter area, the pointer changes its shape indicating the direction in which the splitter can be moved:
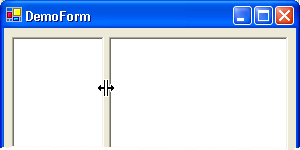
In some situations the use of a splitter is not that obvious:
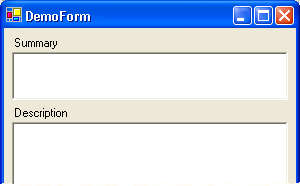
Would you expect the summary field to be resizable? In this case, it would be better to give the (first-time) user a hint showing a drag handle, e.g.:
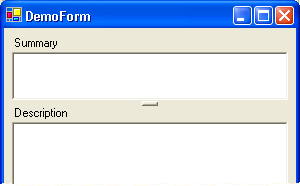
I needed a splitter like this for GhostDoc, fortunately writing one is extremely easy. Basically, all I had to do is to derive a new class from System.Windows.Forms.Splitter and override the OnPaint method. In case you're interested, you can download the source code and a small demo project here.
Note that this control is ripped directly from the GhostDoc project and thus is not highly configurable. I changed the default docking to "top" matching the typical use case (other docking is still possible) and the thickness of the splitter is fixed. Simply regard the code as a good start for your own splitter control (e.g. if you want to change the drag handle's appearance).
-
ReadOnlyRichTextBox
Writing texts for dialog boxes can be a pretty time-consuming task. When using only label controls, the constant tweaking of both wording (resulting in longer or shorter sentences, words wrapping in different ways) and overall text layout will drive you mad sooner or later.
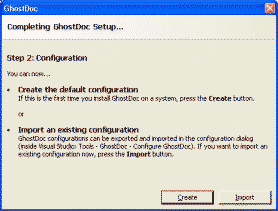
For my Visual Studio add-in GhostDoc I needed a couple of dialogs like this one:
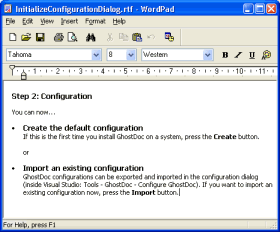
As the text between the header and the buttons was very likely to be tweaked over and over again, I decided right from the start to use a RichTextBox control (border removed, background color set to the form's background color) and write the text in Wordpad:
(I chose RTF over HTML because of the speed and ease of use of the RichTextBox on a Winform dialog).
To make things look a bit more professional it has to be made sure that the content of the RichTextBox can be neither edited (easy, that's what the ReadOnly property is for) nor selected (just a bit more complicated). I wrote a control derived from RichTextBox called ReadOnlyRichTextBox that does a pretty good job at doing just that; the actual code is pretty simple:
using System;
using System.Windows.Forms;
using System.ComponentModel;
namespace Weigelt.Windows.Forms
{
    public class ReadOnlyRichTextBox : RichTextBox
    {
        protected override void OnGotFocus(EventArgs e)
        {
            // no call of  base.OnGotFocus(e);
            this.Parent.Focus();
        }
        protected override void OnEnter(EventArgs e)
        {
            // no call of base.OnEnter(e);
            this.FindForm().SelectNextControl(this,true,true,true,false);
        }
        [ DefaultValue(true) ]
        public new bool ReadOnly
        {
            get { return true; }
            set { ; }
        }
        [ DefaultValue(false) ]
        public new bool TabStop
        {
            get { return false; }
            set { ; }
        }
        public ReadOnlyRichTextBox()
        {
            base.ReadOnly=true;
            base.TabStop=false;
            this.SetStyle(ControlStyles.Selectable, false);
        }
    }
}
This control drives away any attempt to focus or select it. In order for this to work correctly, the ReadOnlyRichTextBox needs at least one other control on the form (for the SelectNextControl). As this is not actually a huge problem, I didn't spend time on finding an alternative solution.
You can download the code and a small demo here.
-
More Layout with Docking
After my recent articles about visual inheritance (Visual Inheritance - How to escape Layout Hell and Visual Inheritance Revisited) I received some mails in which people asked me about docking and windows forms layout in general. One question was about how to resize elements of a layout proportionally when the form is resized, without calculating lots of coordinates.
Imagine you have a form like this:
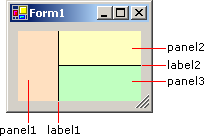
and you want it to resize like this:
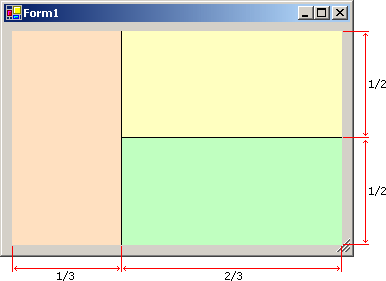
Using docking, this is really easy:
Step 1: Docking
- panel1: Dock left
- label1: Width 1, Dock left
- panel2: Dock top
- label2: Height 1, Dock top
- panel3: Dock fill
(DockPadding.All=8)
Step 2: Handling the form's resize event
protected override void OnResize(EventArgs e)
{
    base.OnResize(e);
    int dx=this.ClientSize.Width - this.DockPadding.Left - this.DockPadding.Right - label1.Width;
    int dy=this.ClientSize.Height - this.DockPadding.Top - this.DockPadding.Bottom - label2.Height;
    panel1.Size=new Size(dx/3,panel1.Height);
    panel2.Size=new Size(panel2.Width,dy/2);
}
You only need to calculate one width and one height - everything else is taken care of automatically by simply docking the layout elements.
-
Visual Inheritance Revisited
- V...I.... What's the "V" stand for?
- Visual.
- What's the --
- Inheritance.
- Ohhhhh........ What was the "V" again?My recent article about visual inheritance generated a lot of positive feedback (at least what I would call "a lot"). In this post, I'll try to answer some the questions I received via email.
Question: How can I reproduce the problems you describe? My first quick test ran without problems...
Create a new Windows Forms application, and add two labels and a button to the form "Form1" (setting the background colors of the labels makes it easier to see what is happening later). Arrange the controls on the form as shown in the following screenshot:
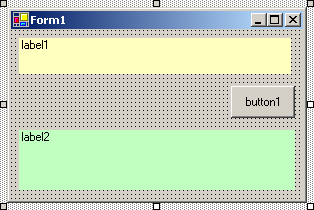
Now anchor the controls:
- label1: Top, Left, Right
- button1: Top, Right
- label2: Top, Bottom, Left, Right
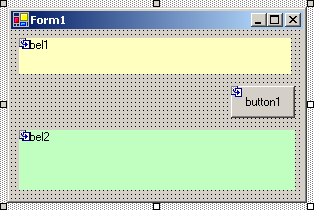
Compile the project, and add an inherited form ("Form2"). The form will look like this:
Set the
Textproperty to "Form2". Resize the form and add a button ("button2"):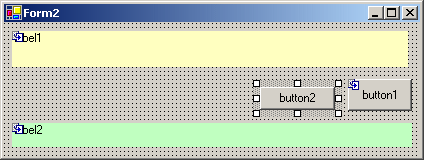
Anchor the button to Top, Right, then compile again.
Be prepared for a surprise: after the project is compiled, you get something like this...
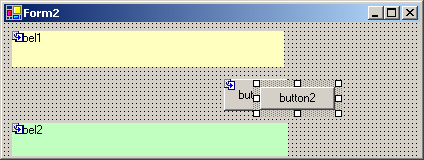
Question: What's the reason for this odd behavior?
Let's take a look at the code of the
InitializeComponent()method of base form:private void InitializeComponent()
{
this.label1 = new System.Windows.Forms.Label();
this.button1 = new System.Windows.Forms.Button();
this.label2 = new System.Windows.Forms.Label();
this.SuspendLayout();...code for the controls...
    //
    // Form1
    //
    this.AutoScaleBaseSize = new System.Drawing.Size(5, 13);
    this.ClientSize = new System.Drawing.Size(292, 169);
    this.Controls.Add(this.label2);
    this.Controls.Add(this.button1);
    this.Controls.Add(this.label1);
    this.Name = "Form1";
    this.Text = "Form1";
    this.ResumeLayout(false);
}
Obviously, this is generated code. When speaking of "serialization" of objects, people usually think of serializing an object to binary data or XML; in this case the object (instance of class
Form1) is serialized to code. This code contains everything that is required to create the layout and the controls ofForm1exactly the way it was specified in the forms designer. Every property is set exact to the required value, e.g. if a panel is docked, not only is theDockproperty set, but also theLocationandSize. So events are neither necessary nor wanted (because of their sheer quantity when settings properties like like e.g.Sizefor each control). This is why basically everything except the creation of the control instances is kept inside the linesthis.SuspendLayout();
and
this.ResumeLayout(false)
The call to
SuspendLayout()temporarily suspends the layout logic,ResumeLayout()turns it back on. The argumentfalsetells the form not to handle pending layout requests, because there's no need to - everything is already laid out as it was designed. So far, everything is ok.Now, what's happening inside the derived class
Form2?In each form class, the constructor of the class calls the method
InitializeComponent(). This method is private, so each class has its own method. When an instance of classForm2is created, the order of execution is- Enter Constructor
Form2() - Enter Constructor
Form1() - Call
InitializeComponent()of classForm1 - Exit Constructor
Form1() - Call
InitializeComponent()of classForm2
In the moment the constructor of the base class is left, the layout and the controls are perfect for a
Form1instance - but that's not what we want. The methodInitializeComponent()of classForm2contains the code that is necessary to achieve the desired layout by tweaking the base form and adding the second button. While setting theTextproperty to "Form2" is rather trivial, setting theClientSizeproperty causes serious trouble. The problem is that the size is set while the layout logic is suspended; i.e. the size of the form is changed, but the anchored elements of the base class are not updated.If you're interested, try the following:
- Remove class
Form2 - Save everything, close all windows
- Recompile
- Create
Form2again (as described above), but don't recompile. - Close the designer window, open the code window
- Remove the
SuspendLayout()andResumeLayout()statements fromInitializeComponent()in classForm2. - Save and close the window
- Recompile
If you now open
Form2in the designer, the form will be fine. But if you change anything (e.g. move the second button) and recompile, the form will be scrambled again. This is because the code ofInitializeComponent()was generated again - including theSuspendLayout()andResumeLayout()statements. By the way: if you don't put a control on the derived form, the two statements are not generated, and thus the derived form is displayed as expected. This explains why some people at first couldn't reproduce the effects I described in the other article.Question: So why does docking work, but not anchoring?
- Docking tells a control to grab as much space as possible (for top/bottom/left/right: towards to the specified direction) until a border of the container is reached. When the size of the control's container changes, the border is moving, so the docked control will resize itself accordingly.
- Anchoring tells a control to keep a constant distance between a specified border (top/bottom/left/right) of the control and the corresponding border of the container at all times. Now if the container is resized while layout is suspended (which is the case in
InitializeComponent()of classForm2), the anchored control does not notice the change. When layout is resumed, the control will keep the distance that exists at this time. This can be observed if you resize the form either inside the forms designer or at run time. The anchoring works perfectly, but unfortunately using the wrong offsets...
