Contents tagged with Visual Studio
-
How to (Find the Option to) Enable Separator Lines for C# in Visual Studio
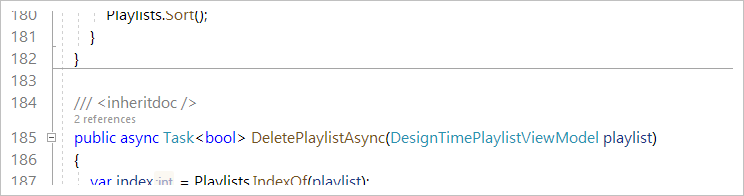
Today I learned that Visual Studio can display separator lines between methods. The lines are enabled for VB.Net by default, but not for C# (which is why I did not know this option exists in the first place).
It turned out that knowing what to do is only half the way, though.
How to do it
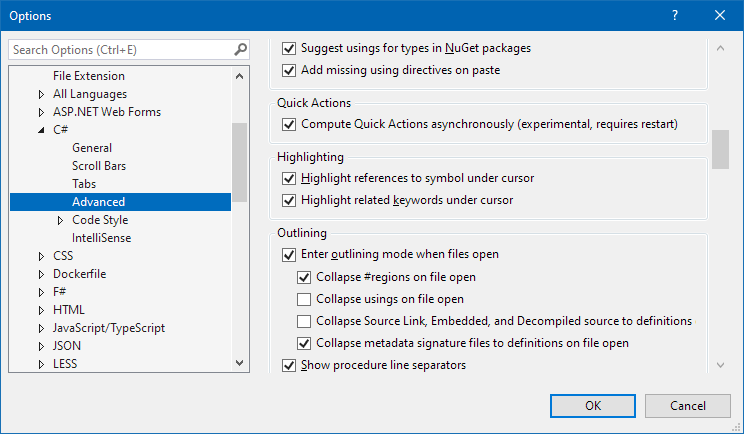
Open the Options dialog (Tools > Options), navigate to Text Editor > C# > Advanced and tick the checkbox “Show procedure line separators”. Sounds easy enough.
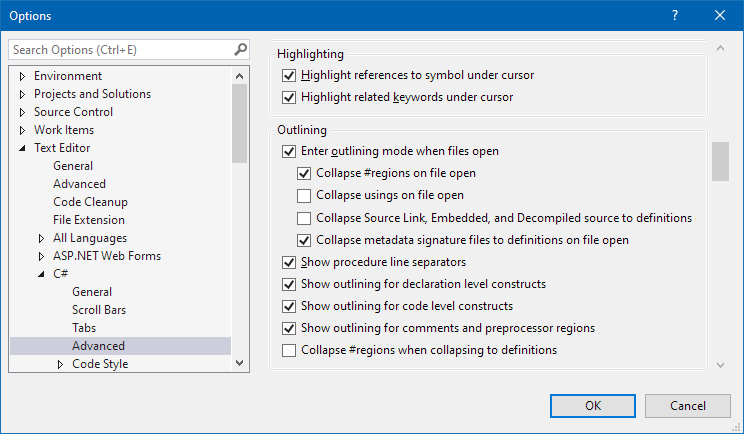
Unfortunately, the option is not visible at first:
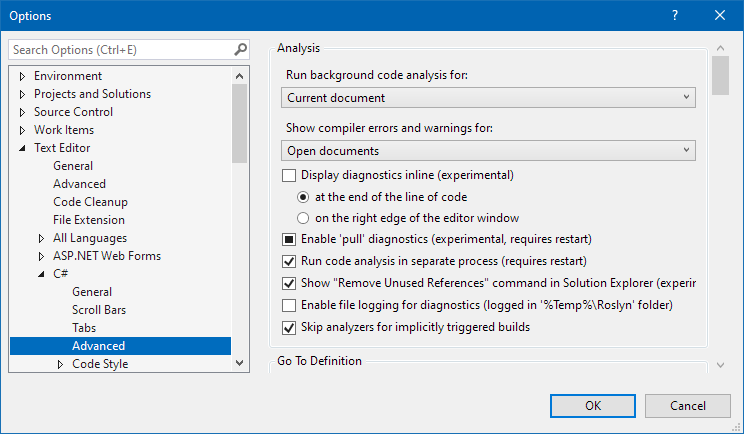
You have to scroll down a considerable number of lines to find the option, and it is very easy to scroll past it:
(Hint: It’s the fifth option from the bottom)
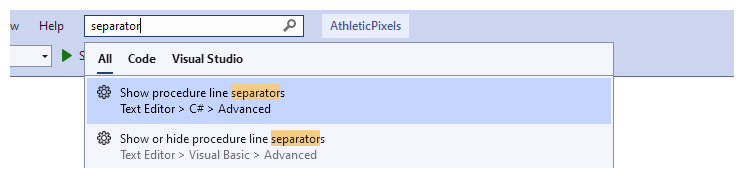
Use the search…
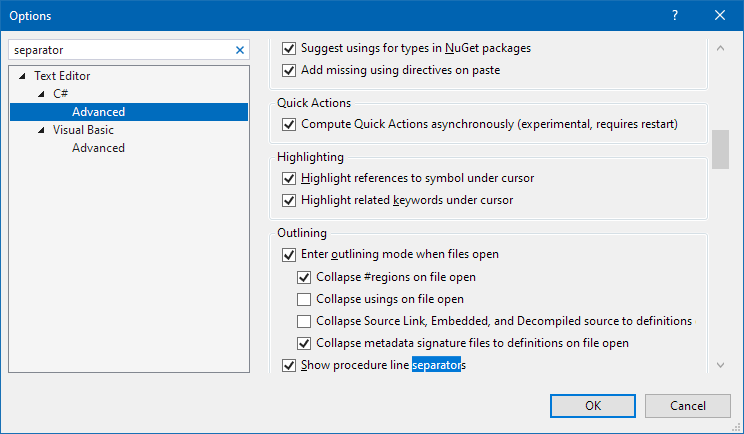
Navigating to the option is much easier if you use the dialog’s search feature. Type “separator” into the search box and the dialog will scroll to the option, highlighting the search term:
As a side note, when it comes to a search feature as part of the UI, there tend to be two large groups of people: Those who use the search all the time and those who for some reason did not even notice it in the first place (maybe because it did not exist when they started using the product many years ago).
… but not all searches are equal
In addition to the search feature of the Options dialog, Visual Studio also has a global search feature, which will find the option as well:
A small drawback is that you do not get the highlight for the search term (but at least the option is now at the bottom of the visible area):
A workaround is to press Ctrl+A, Ctrl+C (i.e., copy the search term to the clipboard) before hitting Enter in the global search. Then, when the Options dialog opens, you continue with Ctrl+E, Ctrl+V to paste the search term into the text box. This will make the highlight visible.
-
The Search for a Proportional Font for Developers (Revisited for VS Code)
Back in 2016, in my article “The Search for a Proportional Font for Developers”, I wrote about trying out various fonts as a replacement for Segoe UI, a sans-serif font which once had, but then lost serifs for the uppercase “i”. In the end I settled on Ebrima, which (according to Wikipedia) “is an OpenType font designed to support African writing systems.” And: “Its Latin alphabet is based on the Segoe font.” The design of the Latin alphabet is based on the Segoe UI font from before Windows 8, i.e., it still has the serifs for the uppercase “i”.
There is an issue, though: The backtick character in Ebrima has a special behavior that most likely has its roots in the original purpose of the font but does not work well for displaying source code. Which turned out to be a problem when I started to work more with TypeScript/JavaScript in addition to my usual C# development.
Look at this example, first shown using the Consolas font:
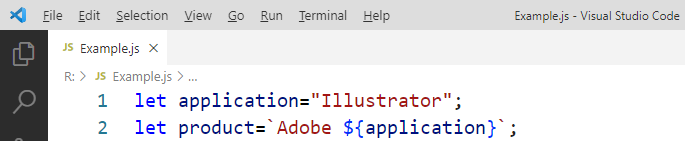
(The font size is larger than usual for demonstration purposes)
And now in Ebrima:
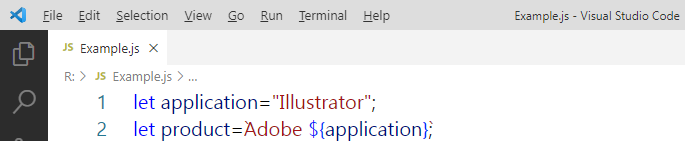
Note that the backticks are barely visible.
Here is the example in Segoe UI:

The backticks are now visible, but uppercase “i” and lowercase “L” are hard to distinguish (even more so at my usual font size).
Stylistic sets to the rescue
When Segoe UI was updated for Windows 8, the original designs of the modified glyphs were moved to the SS01 OpenType stylistic set instead of removing them altogether. Which means that they can be brought back – if you know how.
The “regular” Visual Studio does not let you activate stylistic sets (not exactly a surprise, we cannot even have italics in the editor out-of-the-box). But Visual Studio Code does.
In the font settings UI, under “Font Ligatures”, press the “Edit in settings.json” link:
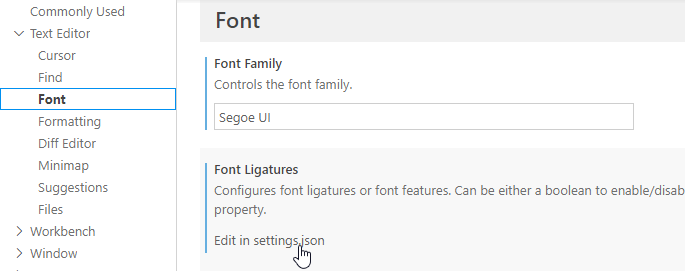
Next, add the following setting for
editor.fontLigatures(note the double and single quotes):{ ...
"editor.fontLigatures": "'ss01'", ... }This is the result:

Nice!
Now if only the WPF-based, “big” Visual Studio (which I use for my C# development) would be a bit more flexible when it comes to fonts…
-
Emaroo 4.9.0 - Support for Visual Studio Code 1.64
Emaroo is a free utility for browsing most recently used (MRU) file lists of programs like Visual Studio, VS Code, Word, Excel, PowerPoint, Photoshop, Illustrator and more. Quickly open files, jump to their folder in Windows Explorer, copy them (and their path) to the clipboard - or run your own tools on files and folders with custom actions!
- Download Emaroo on www.roland-weigelt.de/emaroo
About this Release
- Updated: Support for Visual Studio Code 1.64 (changes regarding most recently used folders/workspaces). Previous versions of Visual Studio Code are still supported.
-
Emaroo 4.8.0 - Support for Visual Studio 2022 / Adobe CC 2022
Emaroo is a free utility for browsing most recently used (MRU) file lists of programs like Visual Studio, VS Code, Word, Excel, PowerPoint, Photoshop, Illustrator and more. Quickly open files, jump to their folder in Windows Explorer, copy them (and their path) to the clipboard - or run your own tools on files and folders with custom actions!
- Download Emaroo on www.roland-weigelt.de/emaroo
About this Release
- Added: Support for Visual Studio 2022.
-
Added: Support for Photoshop / Illustrator / InDesign CC 2022.
-
Changed: Emaroo no longer looks for Adobe CC versions prior to 2020 by default. This does not affect support for CS6 versions.
If you still need support for older CC versions, you can enable it as follows:
- Close Emaroo
- Start Notepad as Administrator
-
Open the file
in the installation directory (usuallyEmaroo.exe.config
)C:\Program Files (x86)\Weigelt\Emaroo -
Set
option toSearchForOldAdobeCCApplicationsTrue - Save the config file and start Emaroo.
-
How to Access Webcam Properties from C#
My Logitech C920 webcam requires some tweaking of settings like exposure, gain, focus, etc. to get good image quality. I uninstalled the “feature rich” Logitech software and now change the settings using the bare-bones Windows webcam properties dialog. This works well for me; unfortunately, the settings are not persisted reliably. After a cold-boot, or sometimes after simply starting an application that uses the webcam, I have to make the adjustments again.
That is why I became interested in what would it take to read and write the webcam properties and to open the properties dialog from C#. The result of a web search was a bit intimidating as I came across multimedia APIs that go way beyond what I intended to do. After all, I only wanted to access the properties, not write a full-blown video capture suite.
In the end I settled on DirectShow.Net, a C# wrapper around DirectShow under LPGL license. Even though DirectShow is an old API and the DirectShow.Net project seems to be no longer active, I found one very important reason to use it: A working sample that opened the webcam properties dialog.
This blog post starts with a guided tour through the sample, with the intended side-effect of making the sample easier to discover on the web. Additionally, I will describe how to access the properties from your code.
Step 1: Download DirectShow.Net
- Visit http://directshownet.sourceforge.net/
- Go to “Downloads”
- Download the latest version of the library (
DirectShowLibV2-1.zipat the time of this writing) - Download the samples (
DirectShowSamples-2010-February.zip) - Unpack the ZIP files so that the folder
Samplesis in the same directory asDocs,libandsrc. - The
libfolder contains the fileDirectShowLib-2005.dllwhich the samples reference.
Step 2: Run the “DxPropPages” demog
- Open
Samples\Capture\DxPropPages\DxPropPages-2008.slnin Visual Studio and let the “One-way upgrade” finish. - Run the project.
- In the window that appears,
- select your webcam and
- press the “Show property pages” button.
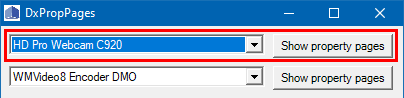
- On my computer, a properties dialog with two tabs appears. Depending on your drivers/webcam software, the dialog may have been replaced. But the generic, low-level dialog looks like this:
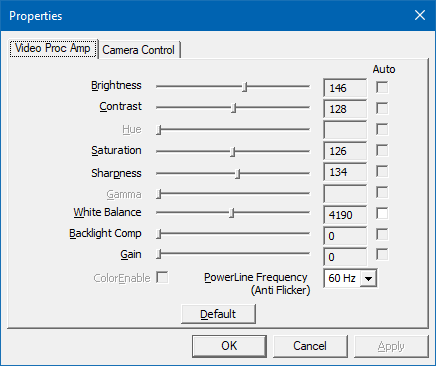
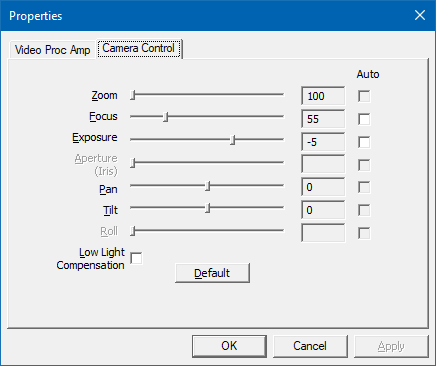
(Remember “Video Proc Amp” and “Camera Control”, we will come across these names later)
Step 3: Look at the code
- Stop the program.
- Open the code view of the file
Form1.cs. - Set a breakpoint at the start of
- the constructor e
Form1(), - the
comboBox1_SelectedIndexChanged()event handler, and - the
DisplayPropertyPage()method. - Run the program in the debugger.
How to get the available webcam(s)
When the first breakpoint is hit, you will see the following lines:
foreach (DsDevice ds in DsDevice.GetDevicesOfCat(FilterCategory.VideoInputDevice))
{
    comboBox1.Items.Add(ds.Name);
}
The code gets all available “video input devices” (which include webcams) and fills the dropdown that you used in step 2 to choose your webcam.
A
DsDeviceinstance has two important properties for identifying a device:Namereturns a human-readable name (i.e., what you saw in the dropdown list)DevicePathreturns a unique identifier.
At this point, the sample does not store the instances, only the names, even though we need the
DsDeviceinstance for the selected webcam later. I am not sure whether there is a reason for this other than keeping the sample code short and to be able to re-use theCreateFilter()method (which we will look at soon).How to open the properties dialog
Now continue to run the program. The
comboBox1_SelectedIndexChangedevent handler gets called automatically during startup. If your webcam is not the first device, let the program continue and select the webcam in the dropdown.After the breakpoint has been hit, look at the code.
- The purpose of the event handler is to set the field
theDevice(of typeIBaseFilter) which we need later. - The call of
Marshal.ReleaseComObject(theDevice)when switching between devices is a reminder that we are dealing with COM and its reference counting (instead of relying on garbage collection). - Note that the variable name
devicepathis misleading; the dropdown contains the display names of the devices. This becomes clear when we look at theCreateFilter()method: The second parameter is calledfriendlynamewhich is more appropriate.
Inside the
CreateFilter()method, some “COM stuff” happens. The important bit for us is that the returnedIBaseFilteris assigned to the fieldtheDevice, which is used in thebutton1_Clickhandler when callingDisplayPropertyPage().The method
DisplayPropertyPage()contains even more COM stuff that we can ignore for now, because the method does exactly what its name says. We will see later that we need some basic understanding what is happening inside, though.How to make the controls in the dialog appear “Windows 10”-like
The steps described my blog post “Windows 10 Theme for a Properties Dialog” for a WPF application are also valid for WinForms. In the case of the sample application the change also affects the controls of the main window.
Step 4: Start to experiment
The code inside
DisplayPropertyPage()uses theISpecifyPropertyPagesinterface. Two other interesting interfaces areIAMVideoProcAmpandIAMCameraControl. The names correspond to the pages of the properties dialog. Using the two interfaces, you can access the properties you see in the dialog.How to read or write the webcam properties from your code
The interfaces
IAMVideoProcAmpandIAMCameraControlboth offerGetRange(),Get()andSet()methods.For
IAMCameraControl, these methods are defined like this:int GetRange( [In] CameraControlProperty Property, [Out] out int pMin, [Out] out int pMax, [Out] out int pSteppingDelta, [Out] out int pDefault, [Out] out CameraControlFlags pCapsFlags ); int Set( [In] CameraControlProperty Property, [In] int lValue, [In] CameraControlFlags Flags ); int Get( [In] CameraControlProperty Property, [Out] out int lValue, [Out] out CameraControlFlags Flags );
When using the methods:
- You specify the property you want to access via an enum value of type
CameraControlProperty. Your device may not support all properties, though – if you look at the screenshots above, you will notice that some sliders are disabled. Therefore it is important to check the return value to be 0 (zero) for a successful call. - The
CameraControlFlagsvalue contains information whether the property is (or should be) set automatically and / or manually.
Let us say you want to access the “exposure” property of your webcam (this may or may not work on your webcam; if not, you can try another property).
For a quick-and-dirty test, resize the “Show property pages” button so can add another button next to it, double click the new button and insert the following code into the “Click” event handler:
var cameraControl = theDevice as IAMCameraControl;
if (cameraControl == null) return;

cameraControl.GetRange(CameraControlProperty.Exposure,
	out int min, out int max, out int steppingDelta,
	out int defaultValue, out var flags);

Debug.WriteLine($"min: {min}, max: {max}, steppingDelta: {steppingDelta}");
Debug.WriteLine($"defaultValue: {defaultValue}, flags: {flags}");
When I run the program, select my Logitech C920 webcam and press the button I added above, the following appears in the debug output window in Visual Studio:
min: -11, max: -2, steppingDelta: 1
defaultValue: -5, flags: Auto, Manual
This means that the exposure can be adjusted from -11 to -2, with -5 being the default. The property supports both automatic and manual mode.
Not all properties have a stepping delta of 1. For the Logitech C920, for instance, the focus property (
CameraControlProperty.Focus) has a range from 0 to 250 with a stepping delta of 5. This is why setting the property value to e.g. 47 has the same effect on the hardware as setting the value to 45.Calling the
Get()andSet()methods is simple. For instance, setting the focus to a fixed value of 45 looks like this:cameraControl.Set(CameraControlProperty.Focus, 45, CameraControlFlags.Manual);
The
CameraControlFlags.Manualtells the webcam to switch off aufo-focus.Where to go from here
Note the COM pitfall in the sample
If you are as inexperienced working with COM interop as I am and look at the original sample code inside
DisplayPropertyPage(), you may notice that the lineISpecifyPropertyPages pProp = dev as ISpecifyPropertyPages;
seems to have a corresponding
Marshal.ReleaseComObject(pProp);
Does this mean that we need a similar call in our experimental code we added above?
No, because if you add the (only supposedly) “missing”
Marshal.ReleaseComObject(cameraControl)to your code and click the button repeatedly, you will run into this exception:System.Runtime.InteropServices.InvalidComObjectException HResult=0x80131527 Message=COM object that has been separated from its underlying RCW cannot be used. Source=DxPropPages …
What is happening here? The answer is that simply “casting” to a COM interface in C# is not something that has to be “cleaned up”. The code may imply that, but you could change the line
Marshal.ReleaseComObject(pProp);
to
Marshal.ReleaseComObject(dev); // oDevice would work, too
and it still would run without leaking references.
How do I know? Because
Marshal.ReleaseComObject()returns the new reference count and changing the line toDebug.WriteLine(Marshal.ReleaseComObject(oDevice));
will output 1 each time we opened and close the properties dialog. The value of 1 is correct, because want to continue to be able to access the device object.
Placing a copy of that line in front of the call of the external function
OleCreatePropertyFrame()obviously does not make sense and will lead to an exception. But if you do it anyway, just for testing, the debug output will show 0 instead of 1. This shows us that passing the object as a parameter in COM interop – at least in this case – caused the reference count to be increased. This is whyMarshal.ReleaseComObject()is called afterOleCreatePropertyFrame(), not because of the cast toISpecifyPropertyPages.Practice defensive coding
As already mentioned, not all webcams support all properties. And if a webcam supports a property, the allowed values may differ from other devices. That is why you should use
GetRange()to determine- whether a property is supported (return value 0),
- the range of the allowed values, and
- whether the property can be set to “auto”.
Last, but not least: When you access a USB webcam – like any other detachable device – be prepared for it not being available. Not only at startup, but also while your program is running, because the device could have been unplugged unexpectedly.
-
Windows 10 Theme for a Properties Dialog
Today I played around with some code in an WPF application that opens a (COM-style) properties dialog.
When opened outside my application, the dialog looked like this:

But when I opened the dialog from my code, it looked like this:

The solution is simple but appears blog-worthy to me because I had a hard time searching the Web using rather unspecific search terms like “properties dialog”, theme, style, etc.
In the end I came across a theme-related Microsoft article for C++ mentioning a manifest file and connected the dots to a StackOverflow question/answer about changing the Windows User Account Control level for a C#/WPF application using a custom manifest.
What to do
Create the custom manifest file
- In Visual Studio (2019), open the context menu of the project for the WPF application.
- Add > New item.
- Ctrl+E (to jump to the search box), enter “manifest”.
- Press the “Add” button to add the “app.manifest” file to the project.
- Visual Studio selects the file automatically (see project properties > Application > Resources > Icon and manifest > Manifest)
Edit the manifest
- Open the “app.manifest” file.
- Scroll to the bottom.
- Uncomment the section behind the “Enable themes for Windows common controls and dialogs (Windows XP and later)” comment.
- Rebuild.
That’s it!
In case you are wondering about my (webcam) experiment: This will be the topic of an upcoming blog post.
-
Quick #if … #endif in Visual Studio
In my previous blog post “Commenting out Code in C# (Oldie but Goldie Tip)” I recommended using “#if … #endif” to disable code lines.
A quick way to do this in Visual Studio:
- Select the code lines you want to disable.
- Hit Ctrl+K, Ctrl+S to open the following popup:

- Press the Down Arrow key, then Enter.
- Enter an undefined symbol name (e.g. DISABLED). Note: the default is “true”, which is defined and thus does not disable the code).
-
Notes on Migrating a WPF Application to .NET Core 3.0
Recently, I migrated a WPF application from .NET Framework 4.7.2 to .NET Core 3.0, which took me about two hours in total. The application consisted of four assemblies (one EXE, one UI class library, two other library assemblies).
A Google search for “migrate wpf to .net core 3” brings up enough helpful documentation to get started, so this post is mainly a reminder to myself what to look out for the next migration – which may be far enough in the future that I’ll have forgotten important bits by then.
How to get started
My starting point was the Microsoft article “Migrating WPF apps to .NET Core”. A lot of text, which makes it easy to get impatient and start just skimming for keywords. Tip: Do take your time.
In my case, I somehow missed an important detail concerning the
AssemblyInfo.csfile at first.AssemblyInfo.cs
When you migrate to .NET Core and use the new project file format, you have to decide what you want to do about the
AssemblyInfo.csfile.If you create a new .NET Core project, that file is autogenerated from information you can enter in the “Packages” section of the project properties in Visual Studio (the information is stored in the project file).
In the .NET Framework version of the UI class library, I used the attributes
XmlnsDefinitionandXmlnsPrefixto make the XAML in the EXE project prettier. That’s why I wanted to keep using anAssemblyInfo.csfile I could edit manually. For this, I had to add the following property:<GenerateAssemblyInfo>false</GenerateAssemblyInfo>
PreBuild Step
I use a pre-build step in my UI library project (calling a tool called ResMerger), After the migration, macros like
(ProjectDir)were no longer resolved. The migration document does not cover pre/post build events (at the time of this writing). But the article “Additions to the csproj format for .NET Core” does, in the section “Build events”.PreBuild event in the old csproj file:
<PropertyGroup>
    <PreBuildEvent>"$(SolutionDir)tools\ResMerger.exe" "$(ProjectDir)Themes\\" $(ProjectName) "Generic.Source.xaml" "Generic.xaml"
    </PreBuildEvent>
</PropertyGroup>
And in the new csproj file:
<Target Name="PreBuild" BeforeTargets="PreBuildEvent"> <Exec Command=""$(SolutionDir)tools\ResMerger.exe" "$(ProjectDir)Themes\\" $(ProjectName) Generic.Source.xaml Generic.xaml" /> </Target>Note that the text of the PreBuild step is now stored in an XML attribute, and thus needs to be XML escaped. If you have a lot of PreBuild/PostBuild steps to deal with, it’s maybe a good idea to use the Visual Studio UI to copy and paste the texts before and after migrating the project file.
WPF Extended Toolkit
My application uses some controls from the Extended WPF Toolkit. An official version for .NET Core 3 has been announced but is not available yet. For my purposes I had success with a fork on https://github.com/dotnetprojects/WpfExtendedToolkit, your experience may be different.
Switching git branches
Switching back and forth between the git branches for the .NET framework and .NET Core versions inside Visual Studio results in error messages. To get rid of them, I do the typical troubleshooting move of exiting Visual Studio, deleting all
binandobjfolders, restarting Visual Studio and rebuilding the solution. Fortunately, I don’t need to maintain the .NET framework in the future. The migration is done and I can move on.Automating the project file conversion
For the next application, I’ll likely use the Visual Studio extension “Convert Project To .NET Core 3” by Brian Lagunas. I installed the extension and ran it on a test project – a quick look at the result was promising.
-
Speakers, Check Your Visual Studio Code Theme!
tl;dr: If you use Visual Studio Code in your talk, please do the audience a favor, press Ctrl+K, Ctrl-T and choose the theme that best fits the lighting situation, not your personal taste.
Some people like “dark” UI color schemes, i.e. dark background with light text and icons. Others prefer black text on light background. Visual Studio 2019 comes with a light theme by default, Visual Studio Code with a dark theme. So, what is better?
As long you are on your own at work or at home, the answer is “whatever gives you the best experience”.
But as soon as you speak at a conference or a user group meetup, or maybe just in front of your colleagues, it’s no longer about you. It’s about what is best for your audience.
Source code is different from slides
When you are showing source code in a talk, you must find a compromise between the font size and the amount of text that is visible without too much horizontal scrolling. The result is usually a font size that is smaller than what you would use on a PowerPoint slide. That means that each character consists of far less pixels that either lighten or darken the screen. Which would not a problem per se, if we only had to care about the legibility of white text on dark background or black text on light background.
But source code is usually shown with syntax highlighting, i.e. as text that switches between a variety of colors. Because not all colors have an equal brightness, some parts of the source code can be much harder to read than other. This is especially true with dark themes, when the “dark” background does not appear as dark in the projection as intended, because of a weak projector and/or a bright room. The weaker contrast appears even worse when the colored text stands between white text – exactly the situation with syntax highlighting.
Care about legibility first
Proponents of dark themes cite the reduced eye strain when using a dark background. And they are right, staring at a bright screen in a dark room for a long time can be painful. On the other hand, first make sure the audience members in the back do not have to look twice because parts of the source code are hard to read.
Personally, in all the sessions I attended, I had more problems reading source code on dark-themed IDEs than I suffered from eye strain. Your experience may be different, of course.
Don’t theorize, test
When you set up your computer in the session room before the talk, not only check the font size, but also how well both dark and light themes are readable.
Fortunately, you can switch Visual Studio Code’s color scheme quickly. So, before your talk
- press Ctrl+K, Ctrl+T (or choose File > Preferences > Color Theme in the main menu)
- use the up/down cursor keys to select a theme (e.g. “Light+” or “Dark+”, Code’s default)
- and press Enter to use the theme.
Walk to the back of the room and look for yourself. And… be honest.
It’s not about “it ain’t that bad”
When you test your favorite theme in the room, don’t go for “it’s good enough” just because you like that theme. Switch to a different theme and make an honest assessment: Is “your” theme really better in this room, for this lighting situation? If not, choose another theme.
Thank you!
-
Emaroo: How to Get Visual Studio Code’s New Icon
Emaroo is a free utility for browsing most recently used (MRU) file lists of programs like Visual Studio, Word, Excel, PowerPoint and more. Quickly open files, jump to their folder in Windows Explorer, copy them (and their path) to the clipboard - or run your own tools on the MRU items! And all this with just a few keystrokes or mouse clicks.
- Download Emaroo on www.roland-weigelt.de/emaroo
Emaroo vs. Icons
The May 2019 update for Visual Studio Code (version 1.35) features a new application icon. After installing the update, Emaroo will continue to use the old icon, though.

This is because Emaroo caches the icons of executables (as well as those of MRU files and folders) for a faster startup.
To get the new icon, switch to the “settings” page…

…and click “Refresh icons” in the bottom right corner:

Confirm you want to restart Emaroo…

…and the new icon (which is not exactly dramatically different) will appear after Emaroo has refreshed the icons:


