Contents tagged with Video
-
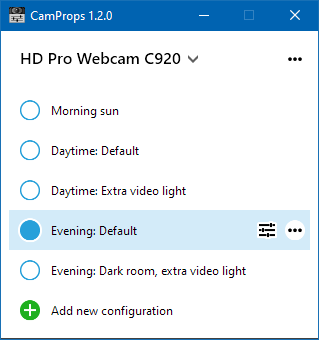
Save and Restore Webcam Properties with CamProps 1.2.0
CamProps is a free utility for quickly adjusting and managing the properties of webcams and other video capture devices. I wrote it when I struggled with my Logitech C920 that required some manual tweaking to achieve a good picture quality. CamProps enables you to store and quickly recall settings which comes in handy if you have different lighting situations in your room – or when the webcam once again simply “forgets” its settings.
About this version
I recently I received feedback from CamProps user José M. Alarcón (who also helped me with the Spanish translation). He has created a large number of presets to deal with the ever-changing lighting conditions in his office. It turned out that the auto-sizing of the main window did not work well, cutting off the list after an arbitrary number of items instead of showing a scroll bar.
Version 1.2.0 fixes this. As previously, the window sizes to its content at startup, but can now be resized and shows a scrollbar if necessary. When you add a new configuration, the window resizes to fit its content.
Where can I get it?
You can download CamProps at https://www.roland-weigelt.de/camprops/
Which devices can I use?
CamProps works with all webcams and video capture devices that support opening the webcam driver property dialog (either the default provided by Windows or a specific dialog by the manufacturer's driver).
For instance, when you press the “
 ” button for a Logitech C920 without the Logitech software installed, this will open the following dialog:
(This dialog may look different for other devices)
-
Using a Video Device with getUserMedia in WebView2 in a Kiosk Scenario (Update)
Back in July I wrote about my experiments with using a video capture device on a web page loaded into the WebView2 component. Since then, WebView2 has received a few updates. I am not sure when or how things have changed (or which version exactly I was using back then), but the workaround I described for using
getUserMedia()without HTTPS no longer worked when I revisited this topic recently.While switching to HTTPS is my goal in the long run, I encountered problems with certificates that look like they could be solved by WebView2 feedback item #624, so I shelved the work on this for my application for now. Fortunately, there is a way to “fake” HTTPS in WebView2 that is good enough to meet the requirements for
getUserMedia().The
CoreWebView2.SetVirtualHostNameToFolderMapping()function allows you to map a server name to a local folder. This way navigating to e.g.https://someServer/somePage.htmlwill load the local filesomePage.htmlcontained in that folder. If the server part and the display part of your application run on different computers, you will obviously have transfer the files e.g. to a temporary folder.The Microsoft documentation contains everything you need to know, so I will not go into further detail here. As usual, when working with WebView2, make sure
yourWebView.EnsureCoreWebView2Async()has been executed before callingyourWebView.CoreWebView2.SetVirtualHostNameToFolderMapping().See also
- ”Get started with WebView2 in WPF” – step by step tutorial in the Microsoft documentation.
- Web search for “webcam video getUserMedia” – useful resources for using video devices in JavaScript.
- Using a Video Device with getUserMedia in WebView2 in a Kiosk Scenario – my previous blog post on this topic, containing information on how to handle the request for permission to use the camera.
-
Using a Video Device with getUserMedia in WebView2 in a Kiosk Scenario
I use Microsoft’s WebView2 control for a digital signage desktop application running in fullscreen mode (“kiosk client”). All visible content is HTML coming from a server (on a private network), so the kiosk client itself has to be updated very rarely.
Right now, I am exploring how to display the output of another computer that is (physically) standing nearby, but on a different network, using a video capture device. Showing the video stream in HTML is pretty straightforward using
navigator.mediaDevices.getUserMedia(). I will not go into detail on this, as a web search for “webcam video getUserMedia” gives you helpful information on how to get things up and running very quickly.Instead, the focus of this article is on two problems that I ran into:
How to avoid the request for permission to use the camera
When browsing the web with a normal browser, nobody wants a web page to be able to simply switch on a webcam or a microphone without the user’s consent. That is why it is a good thing that
getUserMedia()opens a prompt asking the use for permission.For an unattended kiosk display, though, such a prompt is a no-go. The request for permission must be handled programmatically. Fortunately, the
WebView2control offers a way to do this.Let’s say you followed the first steps of the “Get started with WebView2 in WPF” tutorial in the Microsoft documentation, so you have
WebView2control called “webView” in your application window. Now, instead of setting theSourceproperty in XAML, you add an event handler for theLoadedevent. After callingEnsureCoreWebView2Async()you can add an event handler for thePermissionRequestedevent, where things work pretty much as expected: If the requested permission is for the camera, your code allows it.public partial class MainWindow : Window { public MainWindow() { InitializeComponent(); Loaded += HandleLoaded; } private async void HandleLoaded(object sender, RoutedEventArgs e) { await webView.EnsureCoreWebView2Async(); // important webView.CoreWebView2.PermissionRequested += HandlePermissionRequested; webView.Source = new Uri("...URI of your page..."); } private void HandlePermissionRequested(object? sender, CoreWebView2PermissionRequestedEventArgs e) { if (e.PermissionKind == CoreWebView2PermissionKind.Camera) { e.State = CoreWebView2PermissionState.Allow; } } }If you want, you can check the
Uriproperty of theCoreWebView2PermissionRequestedEventArgsto lock down the automatic permission to specific URIs.How to circumvent the requirement for HTTPS for
getUserMedia()- for the purposes of this scenarioMy digital signage solution is currently using HTTP. A web page loaded into Edge/WebView2 this way cannot use
navigator.mediaDevices.getUserMedia(). What does work is using a file URI, both for a local file or a file a remote file share.A local file deployed with the setup for the kiosk application could require more frequent update installations, though. And a file share for this sole purpose is not exactly an elegant solution.
So what I did was to use
WebClient.DownloadFileto download the HTML file on startup via HTTP from the server to a local file in a temporary folder. Then I could navigate to that file using a file URI.At some point in the future, I will move my application to HTTPS. But until then, this solution is good enough.
Update 2021-12-29: The approach described above no longer works. Please see my other blog post for updated information on a workaround.
-
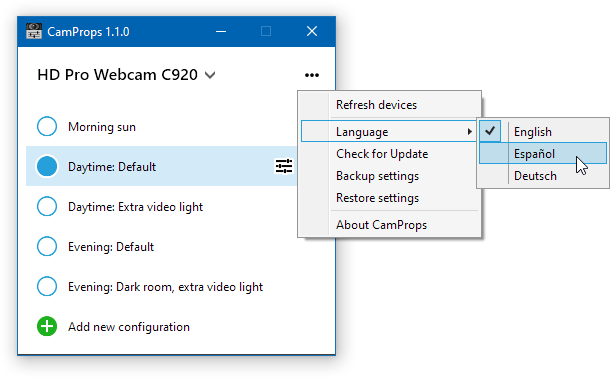
Save and Restore Webcam Properties with CamProps 1.1.0 (ahora también en español)
CamProps is a free utility for quickly adjusting and managing the properties of webcams and other video capture devices. I wrote it when I struggled with my Logitech C920 that required some manual tweaking to achieve a good picture quality. CamProps enables you to store and quickly recall settings which comes in handy if you have different lighting situations in your room – or when the webcam once again simply “forgets” its settings.
Recently José M. Alarcón contacted me to tell me he had written a Spanish article about CamProps. I seized the opportunity and asked him whether he could translate the UI texts. Thanks to José, version 1.1.0 of CamProps now supports Spanish in addition to English and German. When you first start CamProps, it selects the UI language according to your Windows settings. You can override this in the “•••” menu in the upper right corner of the window:
Where can I get it?
You can download CamProps at https://www.roland-weigelt.de/camprops/
Which devices can I use?
CamProps works with all webcams and video capture devices that support opening the webcam driver property dialog (either the default provided by Windows or a specific dialog by the manufacturer's driver).
For instance, when you press the “
 ” button for a Logitech C920 without the Logitech software installed, this will open the following dialog:
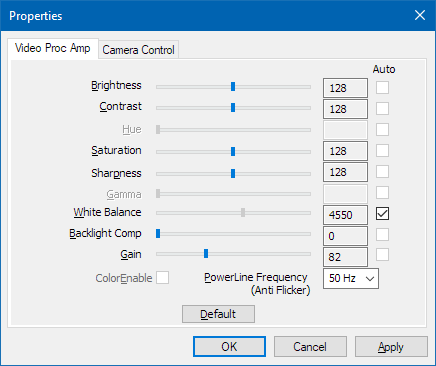
(This dialog may look different for other devices)
-
Adjust, Save and Restore Webcam Properties With CamProps
In recent months, I wrote a few articles that hinted that I was developing a webcam-related utility (here, here, here and here). About two weeks ago, I released it to my colleagues who liked it and found it useful. Now, after some improvements, I am ready for a release to a larger audience.
What is it?
CamProps is a free utility for quickly adjusting and managing the properties of webcams and other video capture devices.

Where can I get it?
You can download CamProps at https://www.roland-weigelt.de/camprops/
Why should I use it?
The picture quality of many webcams can be improved by manually tweaking properties like focus, exposure or gain. When doing so, you may run into a few issues, though:
- If you are in a room with changing lighting conditions, you have to adjust the settings each time you want to use the camera.
- Some third-party software may decide to reset the camera back to default.
- And some devices simply
forget
all settings after a reboot.
CamProps lets you
- quickly adjust camera properties,
- manage different sets of configurations, and
- restore the settings with a single click.
Which devices can I use?
CamProps works with all webcams and video capture devices that support opening the webcam driver property dialog (either the default provided by Windows or a specific dialog by the manufacturer's driver).
For instance, when you press the “
” button for a Logitech C920 without the Logitech software installed, this will open the following dialog:(This dialog may look different for other devices)
How do I start?
- Head to https://www.roland-weigelt.de/camprops/
- Download and install the program.
- Read the “How to…” section on setting up your first configuration, activating a configuration and backing up the automatically stored settings.
-
How to Access Webcam Properties from C#
My Logitech C920 webcam requires some tweaking of settings like exposure, gain, focus, etc. to get good image quality. I uninstalled the “feature rich” Logitech software and now change the settings using the bare-bones Windows webcam properties dialog. This works well for me; unfortunately, the settings are not persisted reliably. After a cold-boot, or sometimes after simply starting an application that uses the webcam, I have to make the adjustments again.
That is why I became interested in what would it take to read and write the webcam properties and to open the properties dialog from C#. The result of a web search was a bit intimidating as I came across multimedia APIs that go way beyond what I intended to do. After all, I only wanted to access the properties, not write a full-blown video capture suite.
In the end I settled on DirectShow.Net, a C# wrapper around DirectShow under LPGL license. Even though DirectShow is an old API and the DirectShow.Net project seems to be no longer active, I found one very important reason to use it: A working sample that opened the webcam properties dialog.
This blog post starts with a guided tour through the sample, with the intended side-effect of making the sample easier to discover on the web. Additionally, I will describe how to access the properties from your code.
Step 1: Download DirectShow.Net
- Visit http://directshownet.sourceforge.net/
- Go to “Downloads”
- Download the latest version of the library (
DirectShowLibV2-1.zipat the time of this writing) - Download the samples (
DirectShowSamples-2010-February.zip) - Unpack the ZIP files so that the folder
Samplesis in the same directory asDocs,libandsrc. - The
libfolder contains the fileDirectShowLib-2005.dllwhich the samples reference.
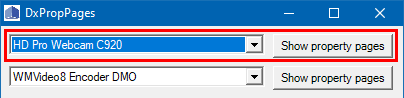
Step 2: Run the “DxPropPages” demog
- Open
Samples\Capture\DxPropPages\DxPropPages-2008.slnin Visual Studio and let the “One-way upgrade” finish. - Run the project.
- In the window that appears,
- select your webcam and
- press the “Show property pages” button.
- On my computer, a properties dialog with two tabs appears. Depending on your drivers/webcam software, the dialog may have been replaced. But the generic, low-level dialog looks like this:
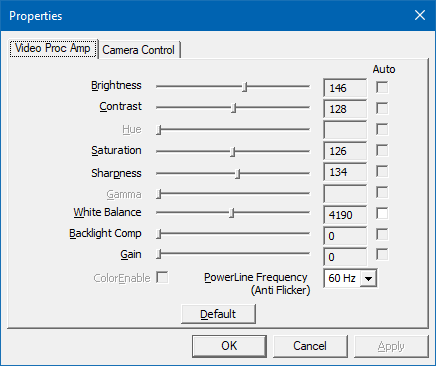
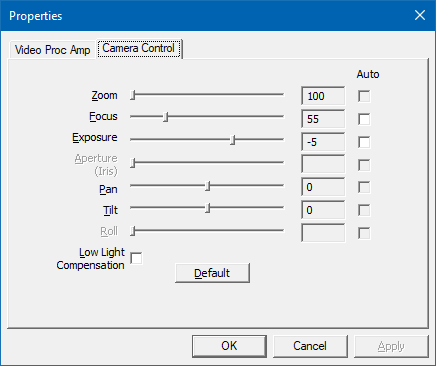
(Remember “Video Proc Amp” and “Camera Control”, we will come across these names later)
Step 3: Look at the code
- Stop the program.
- Open the code view of the file
Form1.cs. - Set a breakpoint at the start of
- the constructor e
Form1(), - the
comboBox1_SelectedIndexChanged()event handler, and - the
DisplayPropertyPage()method. - Run the program in the debugger.
How to get the available webcam(s)
When the first breakpoint is hit, you will see the following lines:
foreach (DsDevice ds in DsDevice.GetDevicesOfCat(FilterCategory.VideoInputDevice))
{
    comboBox1.Items.Add(ds.Name);
}
The code gets all available “video input devices” (which include webcams) and fills the dropdown that you used in step 2 to choose your webcam.
A
DsDeviceinstance has two important properties for identifying a device:Namereturns a human-readable name (i.e., what you saw in the dropdown list)DevicePathreturns a unique identifier.
At this point, the sample does not store the instances, only the names, even though we need the
DsDeviceinstance for the selected webcam later. I am not sure whether there is a reason for this other than keeping the sample code short and to be able to re-use theCreateFilter()method (which we will look at soon).How to open the properties dialog
Now continue to run the program. The
comboBox1_SelectedIndexChangedevent handler gets called automatically during startup. If your webcam is not the first device, let the program continue and select the webcam in the dropdown.After the breakpoint has been hit, look at the code.
- The purpose of the event handler is to set the field
theDevice(of typeIBaseFilter) which we need later. - The call of
Marshal.ReleaseComObject(theDevice)when switching between devices is a reminder that we are dealing with COM and its reference counting (instead of relying on garbage collection). - Note that the variable name
devicepathis misleading; the dropdown contains the display names of the devices. This becomes clear when we look at theCreateFilter()method: The second parameter is calledfriendlynamewhich is more appropriate.
Inside the
CreateFilter()method, some “COM stuff” happens. The important bit for us is that the returnedIBaseFilteris assigned to the fieldtheDevice, which is used in thebutton1_Clickhandler when callingDisplayPropertyPage().The method
DisplayPropertyPage()contains even more COM stuff that we can ignore for now, because the method does exactly what its name says. We will see later that we need some basic understanding what is happening inside, though.How to make the controls in the dialog appear “Windows 10”-like
The steps described my blog post “Windows 10 Theme for a Properties Dialog” for a WPF application are also valid for WinForms. In the case of the sample application the change also affects the controls of the main window.
Step 4: Start to experiment
The code inside
DisplayPropertyPage()uses theISpecifyPropertyPagesinterface. Two other interesting interfaces areIAMVideoProcAmpandIAMCameraControl. The names correspond to the pages of the properties dialog. Using the two interfaces, you can access the properties you see in the dialog.How to read or write the webcam properties from your code
The interfaces
IAMVideoProcAmpandIAMCameraControlboth offerGetRange(),Get()andSet()methods.For
IAMCameraControl, these methods are defined like this:int GetRange( [In] CameraControlProperty Property, [Out] out int pMin, [Out] out int pMax, [Out] out int pSteppingDelta, [Out] out int pDefault, [Out] out CameraControlFlags pCapsFlags ); int Set( [In] CameraControlProperty Property, [In] int lValue, [In] CameraControlFlags Flags ); int Get( [In] CameraControlProperty Property, [Out] out int lValue, [Out] out CameraControlFlags Flags );
When using the methods:
- You specify the property you want to access via an enum value of type
CameraControlProperty. Your device may not support all properties, though – if you look at the screenshots above, you will notice that some sliders are disabled. Therefore it is important to check the return value to be 0 (zero) for a successful call. - The
CameraControlFlagsvalue contains information whether the property is (or should be) set automatically and / or manually.
Let us say you want to access the “exposure” property of your webcam (this may or may not work on your webcam; if not, you can try another property).
For a quick-and-dirty test, resize the “Show property pages” button so can add another button next to it, double click the new button and insert the following code into the “Click” event handler:
var cameraControl = theDevice as IAMCameraControl;
if (cameraControl == null) return;

cameraControl.GetRange(CameraControlProperty.Exposure,
	out int min, out int max, out int steppingDelta,
	out int defaultValue, out var flags);

Debug.WriteLine($"min: {min}, max: {max}, steppingDelta: {steppingDelta}");
Debug.WriteLine($"defaultValue: {defaultValue}, flags: {flags}");
When I run the program, select my Logitech C920 webcam and press the button I added above, the following appears in the debug output window in Visual Studio:
min: -11, max: -2, steppingDelta: 1
defaultValue: -5, flags: Auto, Manual
This means that the exposure can be adjusted from -11 to -2, with -5 being the default. The property supports both automatic and manual mode.
Not all properties have a stepping delta of 1. For the Logitech C920, for instance, the focus property (
CameraControlProperty.Focus) has a range from 0 to 250 with a stepping delta of 5. This is why setting the property value to e.g. 47 has the same effect on the hardware as setting the value to 45.Calling the
Get()andSet()methods is simple. For instance, setting the focus to a fixed value of 45 looks like this:cameraControl.Set(CameraControlProperty.Focus, 45, CameraControlFlags.Manual);
The
CameraControlFlags.Manualtells the webcam to switch off aufo-focus.Where to go from here
Note the COM pitfall in the sample
If you are as inexperienced working with COM interop as I am and look at the original sample code inside
DisplayPropertyPage(), you may notice that the lineISpecifyPropertyPages pProp = dev as ISpecifyPropertyPages;
seems to have a corresponding
Marshal.ReleaseComObject(pProp);
Does this mean that we need a similar call in our experimental code we added above?
No, because if you add the (only supposedly) “missing”
Marshal.ReleaseComObject(cameraControl)to your code and click the button repeatedly, you will run into this exception:System.Runtime.InteropServices.InvalidComObjectException HResult=0x80131527 Message=COM object that has been separated from its underlying RCW cannot be used. Source=DxPropPages …
What is happening here? The answer is that simply “casting” to a COM interface in C# is not something that has to be “cleaned up”. The code may imply that, but you could change the line
Marshal.ReleaseComObject(pProp);
to
Marshal.ReleaseComObject(dev); // oDevice would work, too
and it still would run without leaking references.
How do I know? Because
Marshal.ReleaseComObject()returns the new reference count and changing the line toDebug.WriteLine(Marshal.ReleaseComObject(oDevice));
will output 1 each time we opened and close the properties dialog. The value of 1 is correct, because want to continue to be able to access the device object.
Placing a copy of that line in front of the call of the external function
OleCreatePropertyFrame()obviously does not make sense and will lead to an exception. But if you do it anyway, just for testing, the debug output will show 0 instead of 1. This shows us that passing the object as a parameter in COM interop – at least in this case – caused the reference count to be increased. This is whyMarshal.ReleaseComObject()is called afterOleCreatePropertyFrame(), not because of the cast toISpecifyPropertyPages.Practice defensive coding
As already mentioned, not all webcams support all properties. And if a webcam supports a property, the allowed values may differ from other devices. That is why you should use
GetRange()to determine- whether a property is supported (return value 0),
- the range of the allowed values, and
- whether the property can be set to “auto”.
Last, but not least: When you access a USB webcam – like any other detachable device – be prepared for it not being available. Not only at startup, but also while your program is running, because the device could have been unplugged unexpectedly.
-
Windows 10 Theme for a Properties Dialog
Today I played around with some code in an WPF application that opens a (COM-style) properties dialog.
When opened outside my application, the dialog looked like this:

But when I opened the dialog from my code, it looked like this:

The solution is simple but appears blog-worthy to me because I had a hard time searching the Web using rather unspecific search terms like “properties dialog”, theme, style, etc.
In the end I came across a theme-related Microsoft article for C++ mentioning a manifest file and connected the dots to a StackOverflow question/answer about changing the Windows User Account Control level for a C#/WPF application using a custom manifest.
What to do
Create the custom manifest file
- In Visual Studio (2019), open the context menu of the project for the WPF application.
- Add > New item.
- Ctrl+E (to jump to the search box), enter “manifest”.
- Press the “Add” button to add the “app.manifest” file to the project.
- Visual Studio selects the file automatically (see project properties > Application > Resources > Icon and manifest > Manifest)
Edit the manifest
- Open the “app.manifest” file.
- Scroll to the bottom.
- Uncomment the section behind the “Enable themes for Windows common controls and dialogs (Windows XP and later)” comment.
- Rebuild.
That’s it!
In case you are wondering about my (webcam) experiment: This will be the topic of an upcoming blog post.
-
ASP.Net Core: Slow Start of File (Video) Download in Internet Explorer 11 and Edge
While experimenting with the
tag on an HTML page with a web API endpoint as the source (ASP.NET Core 2.1.1), I noticed that the (not auto-playing) videos<video>- appeared immediately in Chrome and Firefox,
- but took a few seconds in Internet Explorer and Edge to show up on the page.
This is what the code in my controller looked like:
[HttpGet("{id}")] // api/video/example
public IActionResult GetVideoByName(string id)
{
	// ...

	var path = Path.Combine(@"D:\Example\Videos", id + ".mp4");
	return File(System.IO.File.OpenRead(path), "video/mp4");
}
Searching the web for the obvious keywords (IE11, ASP.NET Core, file, stream, slow, download, etc.) yielded lots of results for all kinds of problems. In the end I found out that I needed to enable something called “range processing” (pardon my ignorance, I’m more of a UI guy than a networking expert).
Fortunately, ASP.NET Core 2.1 offers a (new) overload for the
function with a boolean parameter aptly namedFile()
. So the solution is to set that parameter toenabledRangeProcessing
:truereturn File(System.IO.File.OpenRead(path), "video/mp4", true);